I have long advocated for scheduling out your social media posts. Scheduling posts in advance has several benefits: scheduling posts allows you to have a well coordinated and cohesive social media presence, and frees you from a daily responsibility to your social media accounts.
At the end of 2019, Facebook launched its Creator Studio to let creators and publishers manage posts, insights and messages from all of your brands in one place. The Creator Studio also allows the same desktop publishing tools for Instagram as for the Facebook platform.
Why Should I use Creator Studio?
Creator Studio is the ONLY scheduler that is native to the Facebook and Instagram platform. The algorithm gives priority to natively scheduled posts. This alone makes it worth using.
Creator Studio is free. It’s great to be able to cut out a monthly expense right now, or switch that expense to using another marketing tool (like Tailwind, my new favorite).
Creator Studio is hugely functional. Particularly over the other Instagram schedulers: you can tag people and locations, all of your hashtags appear alongside similar tags, making it easy to vary your hashtags and find new ones. For video creators, the Instagram scheduler is the only one that I have found that allows you to select a cover image for your video.
Within Creator Studio, you can view advanced analytics, manage your paid promotions, and access your content library to easily reshare past work.
If you have previously been scheduling on the Facebook platform, you can still schedule posts within your admin panel, but can no longer schedule posts directly from your page.
I anticipate that eventually you will need to use the Creator Studio to schedule any posts, and also hope to see more functionality (like a visual content calendar).
A Look Inside Creator Studio
Once you open a browser window for Creator Studio, you will notice that there are two icons at the top center of your screen. It defaults to the Facebook tab. This will look very similar to the Facebook admin panel that you are familiar with.

You can view stats and work with all of your brands, or just one at a time, if you select that brand from the dropdown menu at the top of the page.
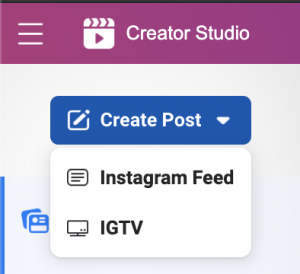
To create a post, click the create post button. The process from there looks exactly like publishing (or scheduling) any other Facebook post.

To access your Instagram admin panel, click the Instagram icon at the top of the page. This will bring up the Instagram dashboard for your brands.

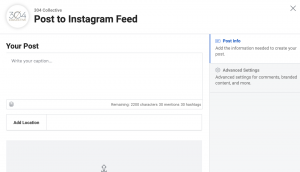
From here, you can access all of your analytics, promotions, and your content library. To create or schedule a post, click the create post button in the upper left. You will have options to create a post, or to upload an IGTV video (these have always been created through the desktop platform). Your options for both will look very similar to the previous options, either in app via IGTV.
Two details you will need to pay attention to:
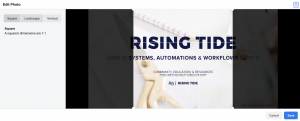
- When uploading anything other than a square image, you need to remember to click to edit the crop, otherwise, it will automatically crop and publish only the center square.
- Be sure when uploading a video, to select the thumbnail. This option appears once you upload a video. If you don’t select a thumbnail, the default is the first frame of your video (often a black screen).
That’s it! A super basic rundown of what is a very easy to use program. Scheduling out your social media posts with any platform will save you hours each week, and lead to a more cohesive and well planned social media presence.
Let us know if you’ve tried it out! Have you found any of the features to be stumbling blocks, or is the platform working well for you. Will it replace any previous schedulers that you have used?
If you’re struggling to create or find video content to share on your social media platforms, the 304 Collective is ready to help. Talk to us about some custom, branded video for your channels today!




Leave A Comment
You must be logged in to post a comment.